
A well-completed and balanced oil painting always gets more attention from buyers. Usually, these paintings have one thing in common which is a perfectly placed layer of varnish. It gives a glossy, maintained, and even surface that improved in colors and visual performance. This blog post aims to provide tips and tricks to improve the varnishing technique for oil painting and what happens if you varnish an oil painting too early.
“The word varnish is derived from a Latin word that is usually used for Amber. Varnish is used for a firm and transparent layer of oil and resin which is coated over a surface to make it firm and solid. In oil painting, the varnish is a transparent layer of retouched or final varnish which artists apply at the top of a completed painting in order to make the surface balanced and protected“
Table of Contents
- Tips for varnishing
- Method to apply Final Varnish
- Important things to know about Demar Varnish
- What if you don’t have time to let the painting completely dry
- Complete the method to apply retouch varnish
- What if the surface is so much big to put on the table
- What happens if you varnish an oil painting too early?
- Final Words
Below is an image showing the difference between before and after varnish. (Note: This image is for information purposes only)
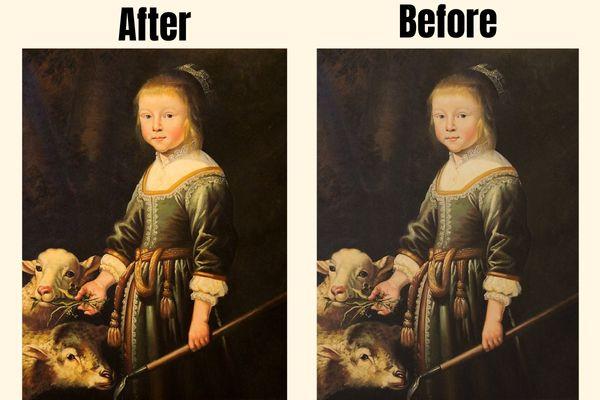
The image on the left side is more colorful, balanced, and attractive as compared to the right image.
Tips for varnishing
There are separate varnishing techniques for every medium. These varnishing techniques are only applicable to oil painting and you cannot use them for acrylics.
1. Oil painting must be dry
Before applying varnish, you have to make sure that your oil painting is completely dry. An ideal time is at least 6 months because oil paint is a slow drier and it continues to move for a long time after the final brush strokes.
It is not dried even when the surface looks completely dried. This is because of the oil paint which is present in the inner layers. Although the upper surface gets dry easily due to the surroundings inner layer does not get any kind of favorable environment to get dry even if the painting is placed in a perfect environment to get dry.
2. Good varnish
As a second priority, you have to make sure that you are using a suitable varnish for your oil painting. There are different kinds of varnish such as professional satin varnish, retouching varnish, etc. These two varnishes are best for oil painting.
Professional Satin Varnish is the best quality varnish which is suitable for high-quality and professional artworks. On the other hand, Retouching varnish is useable for thin layers because it gives temporary protection to your paintings.
3. Dust-free environment
Varnish is sticky which can cause surrounding dust on the painting to make it dull and sandy. To avoid this, you must provide a clean and dust-free environment. You can’t find any other varnish in the market which does not attract dust. It is naturally sticky, so you should avoid this mistake before varnishing.
To practice a clean environment, make sure your studio has an exhaust fan or you clean all the dusty areas with yourself to maintain nice and clean air.
4. Position of canvas
Another important thing is your painting position. You don’t want this protective varnish to create any kind of uneven surface in the painting. To make sure your painting doesn’t get any damage, you have to put it in a flat position on the table before applying varnish.
Keep the amount of varnish unform on the whole surface because it will dry to make the surface thick. So, don’t compromise on the positioning and the amount of varnish in this procedure.
Method to apply Final Varnish
A final varnish is said for a final protective layer of varnish that will protect the surface for a long period of time. Before doing so, you must fulfill all the requirements of time and environment to avoid any drawbacks.
You may need the following things to start this procedure:
- Final varnish: Demar varnish or professional satin varnish
- Clean jar
- A clean piece of cloth
- Soft mop brush
Before applying the final protective layer, your painting must be at least 6 to 12 months old. First of all, take out a small quantity of liquid in a clean jar. Use the mop brush to soak some amount of liquid and start applying it on dull parts.
Put your painting in a flat position on a table or you can place it in a position where the liquid doesn’t get ununiform. After applying it to the whole surface, observe it again and try to find incomplete parts. You can use a cloth piece if you get an unwanted amount of varnish on the bristle of the brush or painting surface. Now, your painting is ready to go to an exhibition.
Important things to know about Demar Varnish
Demar varnish can be quite handy for bringing out the luster and glossiness. It could be very helpful in order to give a perfectly smooth finish touch but it could give you some drawbacks. First of all, it contains citrous solvent and turpentine which can make your painting darker over time. Secondly, it can be a little bit brittle because it gets so much hard after drying.
What if you don’t have time to let the painting completely dry
There are so many scenarios in which artists usually don’t want to wait more because their customers want on-demand availability or they have to show them on exhibition. They want the same perfectly shiny and protective layer of varnish. What should they do?
Well, there is a trick that you can use to get instant varnishing on those paintings which are not completely dry but you have to make sure that at least the upper surface gets fully dry before using this trick.
You can use a retouch varnish which is a temporary varnish. Temporary means it will protect the upper surface for a short period of time but not permanently. Before using retouch varnish, there are some important things that you must know.
- Your painting may not require 6 to 12 months but you should give it at least 2 to 3 months depending on the thickness of the layer. If your painting contains so many thick layers, then you should give it at least 4 months but if it is thin, you can use varnish it within a month.
- As retouch varnish is not a final varnish, so you may need to apply the final varnish after several months in order to maintain the protective layer.
- Apply only a light amount of retouch varnish so that your painting can continue to breathe even after varnishing. This method helps to continue the drying process in your oil painting even after varnishing.
- You gonna need a soft paintbrush to apply a light layer of varnish without damaging the upper surface.
- Always prefer indoor varnishing.
Complete the method to apply retouch varnish
As retouch varnish is temporary and is mostly used for those paintings which are not completely dried. To make sure your painting doesn’t get damaged, you may need the following things in order to avoid any mistake
- Good quality retouch varnish: Winsor & Newton Artists’ Retouching Varnish
- Clean jar
- Clean and soft cloth piece
- Paper towel
- Soft mop brush
Take a clean jar and add some amount of retouch varnish in it to avoid any dust particles coming in contact with the liquid. take a clean and soft brush and dip it in the liquid, don’t let the brush soak so much liquid.
Point out those areas which are looking very dull in the painting. You can use a flashlight on your mobile phone to point out such areas. Hold the brush from the upper end and start applying the liquid lightly without applying pressure on the surface. Only a small amount of varnish is enough to cover the entire dull area.
In case you get so much varnish in the brush, you can use a cloth piece to remove it. This method is going to make significant results in the visuality of your painting. If your brush loses any hair or bristle on the surface, just remove it instantly because it is going to be hard once the varnish gets dry completely.
Finally, use a flashlight to observe the whole surface again to make sure your painting gets a uniform amount of varnish. Now, your painting is ready to display in the exhibition or you can hand over it to the customer by informing him to take it back to you for the final varnish after several months or years.
Tip:
You can use retouch varnish again on a same surface in order to apply any corrections.
What if the surface is so much big to put on the table
If you want to apply retouch varnish on a bigger surface and you can’t put it down on the same table in a flat position then what should you do?
Well, you can let it hang on the same wall where you placed it. Use the same soft mop brush to apply varnish. As it is going to take a long time but still you have to put effort to make your artwork dominant. Follow the same procedure as mentioned above.
What happens if you varnish an oil painting too early?
Oil painting is known for the efforts of an artist. An artist spends months or even years on a single painting to make it worthy. If you think that your oil painting could dry completely in a week or month then you are wrong. Oil painting takes years because there is a slow oxidation process that let the lower layers dry over a period of time. There are also some examples in which oil painting takes up to 100 years to get completely dried.
If you varnish too early then you are going to close all the pores which were providing oxidation to let the lower layers dry. Varnishing earlier means the life of your painting is going to stick and in this life, layers of my face shifting and movement could ruin the original look of your painting.
Final Words
Oil painting is known for long drying time so why should fasten this natural phenomenon? Remember that all the well-known artworks are not built in a single day. They also took several months and years to get completed.
If you are short of time, then you can use a suitable retouch varnish to give the same glossy effect. This is the same as you ordering something and making a payment before the delivery. You have to apply the final varnish after a certain amount of time but you are getting the same varnished surface.
I hope this blog is enough to provide all the necessary information related to varnishing but if you have still some questions, you are always welcome to ask in the comment section.
References:
- Wikipedia, “Varnishing”, Accessed on 7 February 2023, https://en.wikipedia.org/wiki/Varnish.
- Artist Network, “Types of varnish”, Accessed on 7 February 2023, https://www.artistsnetwork.com/art-mediums/oil-painting/varnish-best-practices/.
- Onlineartschool, “How to varnish”, Accessed on 7 February 2023, https://onlineartschool.com/art-school/oil-painting-tips/how-to-varnish-an-oil-painting/.
Read More: