Oil portrait books are amazing for a beginner to catch new ideas and techniques. They are full of old master’s ideas and patterns that enhance an individual interest and keep them motivated. How to paint hair in oil portrait books? Well, you will find some general tips in every portrait book. Considering these ideas, I am going to explain them in simple words so that you can learn to perform them practically.
Things needed to start:
Before starting, make sure you have the basic items to make perfect hair.
- Oil Paint
- Paint Thinner (Recommended: Gamsol)
- Medium (Recommended: Linseed oil)
- A flat brush of 5.5mm
- Any Surface
Mistakes to avoid:
When you try to make hair for the portrait, there are some common mistakes that beginners usually do and they don’t get the desired quality of hair as they want. So, you should take care of the following common mistakes:
- Don’t try to make the work too much complicated. Some artists add so many highlight layers in order to get the desired amount of result. You have to make it simple from the beginning till the end.
- Don’t keep using a small brush to create precise detailing in hair. Remember that oil paints are not gonna dry so quickly. What you are leaving now, can be adjusted later. So avoid using a small brush for every minor detail.
- Always try to control the base. Artists try to make it more realistic, so they add additional light sources. You have to observe the light sources first and then try to make them. If you put so much of them, you are for sure going to get lost.
- Another mistake that artists do is not properly desaturating colors. To create brown hairs, they often add bright orange which gives hot saturation. Adding these kinds of saturation makes the hairs extra vibrant and saturated.
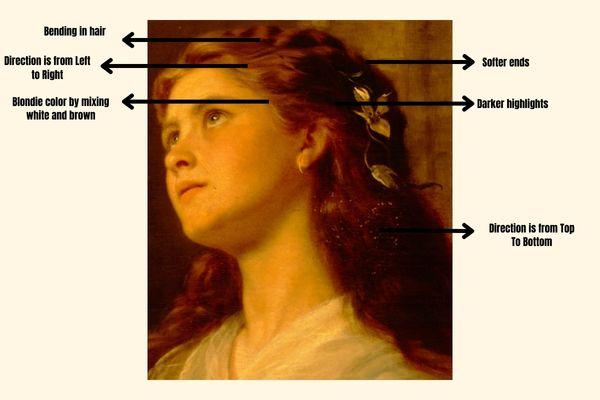
- Real hair always lies down from top to bottom. Beginners don’t use the brush from up to down instead they use it from right to left or left to right which is totally incorrect.
The correct way to paint hair:
To make hairs in the correct way, you gonna need a medium-sized brush such as a flat brush of 5.5mm. Use a black color to create the highlights first. Always use a reference photo and place it in front of your eyes so that you can get a precise measurement of what you are doing. Now, take some colors with medium saturation and use them to create layers. Always remember if you don’t get the right amount of flow, use linseed oil and gamsol to create the desired amount of viscosity. With these mediums, you can also adjust the saturation of your oil paint.
Tip:
Adding more linseed oil going to make the oil paint thin and more thin paint means more bright color. So don't use it too much to keep the color maintained.
Don’t get worried about the details because the highlights you have already added are enough to give fine details. After these layers, you can do work for details. Give bending to the hairs where it is necessary. To do so, you can use thicker paint so that it looks different from the previous layer. At this part, you can also adjust those areas which need to be darker and those also which need to be lighter.
Work slowly and constantly, it is for sure gonna give you an updated version of what you have done before.
Recommended:
- Use of linseed oil in oil painting
- Varnishing tips
- Trends of oil painting in 2023
- Pricing your oil paintings
- Alla Prima and its use
- Reasons of bad smelling oil paints
References:
- Paintingportraits.com, “Drawing hairs”, Accessed on 13 February 2023, https://paintingportraittips.com/how-to-paint-hair-in-oil-paint/.